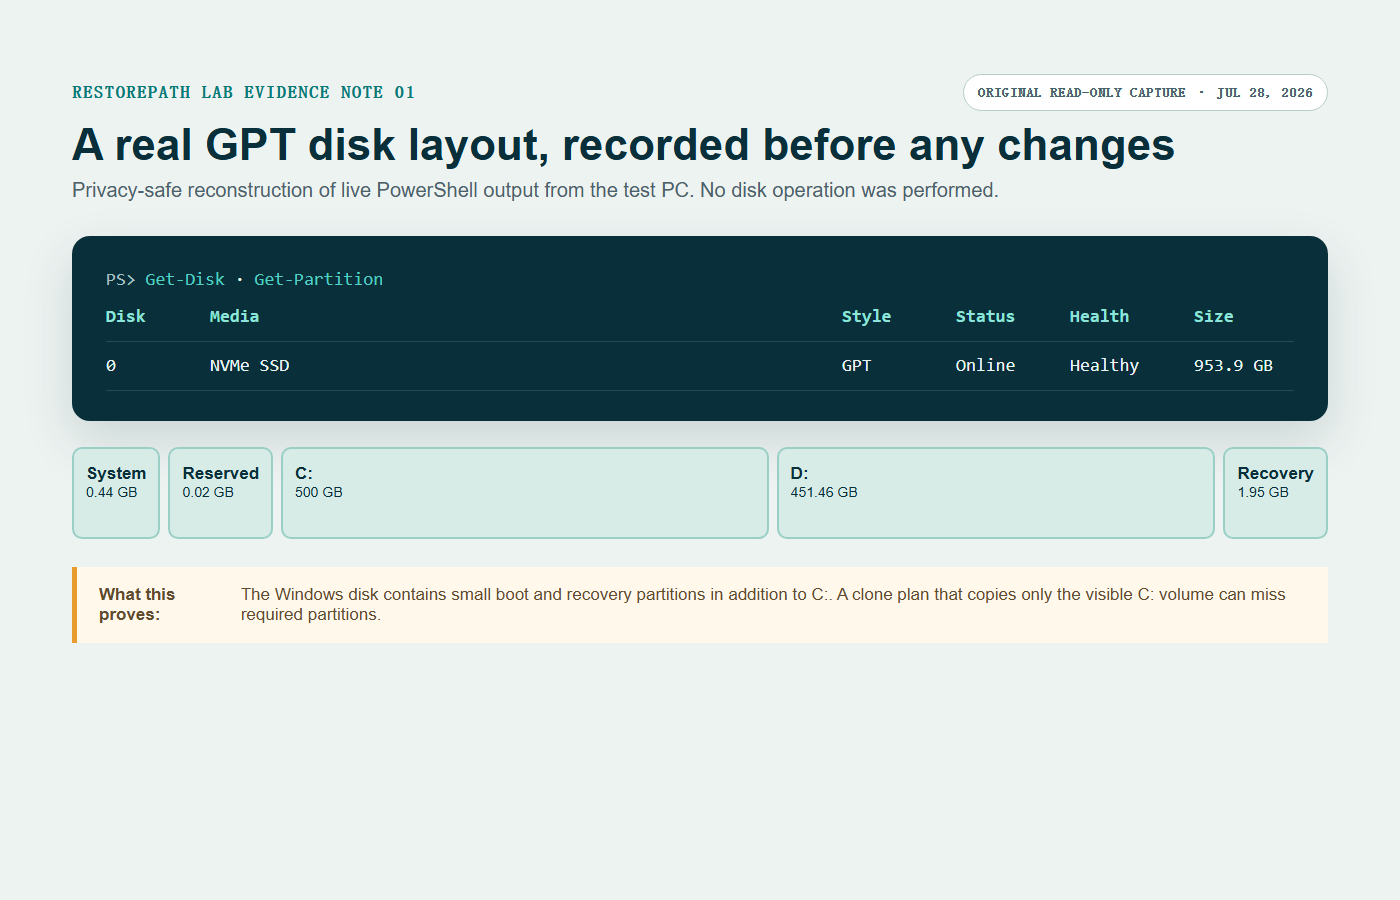
Before cloning Windows to a new SSD, record how the current disk is built. This prevents a common mistake: copying the obvious C partition while missing the small partitions Windows needs to start and recover.
1. Open Disk Management and identify both disks
Right-click Start and choose Disk Management. Expand the window so every partition is visible. Match the source and destination using capacity and, when possible, model information from Device Manager or the SSD vendor's utility.
Write down the source disk number, total capacity, and every partition from left to right. Typical Windows layouts can include an EFI System partition, the C volume, a Recovery partition, and manufacturer recovery partitions. Names vary, so record sizes and positions rather than guessing by color.
2. Check used space, not only advertised capacity
Open File Explorer, right-click C, and choose Properties. The destination SSD must have room for the data that will be copied plus the required system partitions. A nominal 500 GB SSD may show less usable capacity than another “500 GB” drive.
If the destination is smaller than the source, confirm the cloning tool explicitly supports shrinking the copied partition and that total used space fits. Clean up and back up before cloning; do not delete unknown recovery or system partitions to force a fit.
3. Record the partition style
- In Disk Management, right-click the box labeled Disk 0 or the appropriate source disk—not a volume.
- Choose Properties, then open the Volumes tab.
- Record Partition style: GUID Partition Table (GPT) or Master Boot Record (MBR).
- Repeat for the destination if it has already been prepared.
GPT systems normally boot in UEFI mode. MBR systems often use legacy or compatibility boot modes. A clone is easiest to troubleshoot when partition style and firmware boot mode remain consistent during the first attempt.
For the Windows 11 compatibility rules, compare MBR and GPT before changing either setting.
4. Check BitLocker or device encryption
Open Settings and search for Manage BitLocker, or open Control Panel, System and Security, then BitLocker Drive Encryption. Record which volumes are encrypted and save the recovery key somewhere separate from the PC.
Do not turn encryption settings on and off casually during migration. Follow the cloning tool's documented encryption workflow. If protection must be suspended, understand when it will resume and keep the recovery key available for the first boot.
5. Confirm the connection path
- Record whether the old and new drives are SATA or NVMe.
- Confirm the destination will ultimately be installed internally if it must become the Windows boot drive.
- If the SSD is connected through USB for cloning, note the enclosure and cable. A USB bridge may identify the disk differently from an internal slot.
- Check that the laptop is on AC power and that neither drive disconnects under normal file access.
6. Build a one-page clone plan
Your plan should state:
- Source model, capacity, disk number, and partition style
- Destination model, capacity, connection, and intended internal slot
- Partitions to copy and whether any data partition must be resized
- Encryption status and recovery-key location
- Separate backup location and Windows recovery-media location
- How you will select the new SSD on first boot
- How long the original drive will remain unchanged as a rollback
7. Know when the layout needs expert review
Pause if Disk Management shows Dynamic instead of Basic, multiple Windows installations, Storage Spaces, an unusual RAID controller, an OEM layout you cannot identify, a source drive with read errors, or a destination smaller than the used layout. A standard cloning recipe may not apply.
8. Verify the result before erasing anything
After cloning, install or select the new SSD, boot it without relying on the old drive, open representative files and applications, check Windows activation and encryption, and revisit Disk Management. Keep the original drive unchanged until the new system has passed normal use and a restart test.
Official references: Disk Management in Windows, Microsoft's MBR2GPT requirements and cautions, and BitLocker recovery-key guidance.